Consistently backup your virtual machines using libvirt and zfs – part 1

How to backup virtual machines is a pretty interesting topic and a lot could be said. COW file systems like zfs or btrfs actually do most of the job for you, thanks to their snapshotting capabilities. Unfortunately that’s not enough to get consistent backups, because taking a snapshot of a running VM is very similar to unplugging the power cord. In most cases this isn’t as bad as it sounds, but it is extremely bad if you’re running databases or so. That means you will get corrupt data, which is something we want to avoid at all costs. But how to avoid that? Shutting down the machines before taking the snapshots could be a solution, but that’s only viable if you do daily backups at most. What if we want hourly snapshots? That’s simply unfeasible. The next thing we could do is to pause the VM, take a snapshot of the disk, dump the ram and the EFI vars and then resume the guest. That would be way better, but it still involves some kind of downtime. Is it possible to get it any better? If you use qcow2 you could use its internal snapshotting features to do live snapshots of the state of the machine, but that unfortunately doesn’t work anymore if you use UEFI and it’s also not so well maintained. Also you probably want to use ZVOLs, so no way.
The best alternative out there are libvirt external snapshots. They allow you to freeze the VM image (be it a raw file, qcow2 or zvol), take a dump of the ram and then keep writing all subsequent writes to an external qcow2 file. Actually we don’t really need the external qcow2 file at all, because we can use zfs to track the diff instead. It means that as soon as we created the libvirt snapshot we can immediately take a zfs snapshot and then merge back the external file into the original image.
I use sanoid to take the zfs snapshots and I wanted to keep using it. Unfortunately it didn’t support pre/post scripts, but luckily there were some patches floating around. They didn’t expose all the things I needed in order to get it working, so I made my own fork where I forward ported the patch to latest git master, plus adding additional features to get all the data I needed: https://github.com/darkbasic/sanoid
If you’re using Arch Linux here is a PKGBUILD which tracks my branch, with the addition of systemd timers which the AUR package didn’t have: sanoid-git.tar

Let’s see how it’s implemented:

zfs list
rpool/VM 36.0G 357G 24K none
rpool/VM/fedora28 9.04G 41.0G 8.21G /var/lib/libvirt/images/fedora28
rpool/VM/win2k16 26.9G 73.1G 17.3G /var/lib/libvirt/images/win2k16
rpool/VM_snapshots 34K 357G 34K /var/lib/libvirt/snapshots

As you can see I have a dataset called VM which contains an additional dataset for each VM. There I also store the nvram with the EFI VARS, because it’s important to backup them as well. Additionally I have another dataset called VM_snapshots which I use to store the external qcow2 diff. Its only purpose is to avoid that it gets snapshotted along with the rest of the machine: we don’t need it and it will cease to exist a few seconds later.

Here is my sanoid config:

[rpool/VM]
use_template = production,scripts
recursive = yes
# if you want sanoid to manage the child datasets but leave this one alone, set process_children_only.
process_children_only = yes

[template_production]
hourly = 36
daily = 30
monthly = 3
yearly = 0
autosnap = yes
autoprune = yes

[template_scripts]
### run script before snapshot
### dataset name will be supplied as an environment variable $SANOID_TARGET
pre_snapshot_script = /opt/scripts/prescript.sh
### run script after snapshot
### dataset name will be supplied as an environment variable $SANOID_TARGET
post_snapshot_script = /opt/scripts/postscript.sh
### don't take an inconsistent snapshot
#no_inconsistent_snapshot = yes
### run post_snapshot_script when pre_snapshot_script is failing
#force_post_snapshot_script = yes

This is the content of my prescript:

#!/bin/bash
DOMAIN=${SANOID_TARGET##*/}
SNAPSHOT_NAME=${SANOID_SNAPNAME}
RAM_BACKUP=/mem

# Backup xml
cp /etc/libvirt/qemu/${DOMAIN}.xml /var/lib/libvirt/images/${DOMAIN}/

# Find out if running or not
STATE=`virsh dominfo $DOMAIN | grep "State" | cut -d " " -f 11`

if [ "$STATE" = "running" ]; then
# Take a libvirt snapshot
virsh snapshot-create-as ${DOMAIN} ${SNAPSHOT_NAME} \
--diskspec vda,snapshot=external,file=/var/lib/libvirt/snapshots/${DOMAIN}.${SNAPSHOT_NAME}.disk.qcow2 \
--memspec file=/var/lib/libvirt/snapshots/${DOMAIN}.${SNAPSHOT_NAME}.mem.qcow2,snapshot=external \
--atomic
fi

exit 0

Again, you will need my fork of sanoid in order to get pre-post scripts supports and in particular the additional environment variables. Hopefully soon it won’t be necessary anymore.

What’s going on? First we check if the machine is running, because if it isn’t a regular zfs snapshot will be enough. If it’s running, on the other hand, we do an external libvirt snapshot and we dump the memory.
Now all subsequent writes will go through the external qcow2 and sanoid will take the zfs snapshot.

This is the content of my postscript:

#!/bin/bash
DOMAIN=${SANOID_TARGET##*/}
SNAPSHOT_NAME=${SANOID_SNAPNAME}
RAM_BACKUP=/mem

# Find out if running or not
STATE=`virsh dominfo $DOMAIN | grep "State" | cut -d " " -f 11`

if [ "$STATE" = "running" ]; then
# Commits content from top images into base and adjust the base image as the current active image (--pivot)
virsh blockcommit ${DOMAIN} vda --active --wait --pivot

# Delete snapshot
rm /var/lib/libvirt/snapshots/${DOMAIN}.${SNAPSHOT_NAME}.disk.qcow2

# Once the 'blockpull' operation above is complete, we can clean-up the tracking of snapshots by libvirt to reflect the new reality
virsh snapshot-delete ${DOMAIN} ${SNAPSHOT_NAME} --metadata

# Move the ram to a bigger and cheaper drive.
mkdir ${RAM_BACKUP}/${DOMAIN} 2> /dev/null
mv /var/lib/libvirt/snapshots/${DOMAIN}.${SNAPSHOT_NAME}.mem.qcow2 ${RAM_BACKUP}/${DOMAIN}/
fi

exit 0

As soon as the snapshot is taken we want to merge the external qcow2 file back to the original image using blockcommit. We don’t need it because zfs will take care of the diff. Now it’s time to backup our precious ram dump. We don’t want to waste our Optane 3D XPoint memory with it, so it will get stored on a slower and cheaper drive.

What’s next? We still need more sanoid hooks, in particular pre/post pruning scripts because we want to delete our ram dumps when the old snapshots get deleted. I will probably implement it sooner or later, but since I don’t know Perl patches are welcome.

We also want to send/receive our snapshots to an off site machine (zfs snapshots are not backups), but that’s for part 2!

If you want to further look into the topic I suggest you to read the following:
https://www.spinics.net/lists/virt-tools/msg11470.html
https://wiki.libvirt.org/page/I_created_an_external_snapshot,_but_libvirt_will_not_let_me_delete_or_revert_to_it
https://wiki.libvirt.org/page/Live-disk-backup-with-active-blockcommit
https://blog.programster.org/kvm-external-snapshots
https://www.redhat.com/archives/libvirt-users/2013-October/msg00018.html
https://kashyapc.fedorapeople.org/virt/lc-2012/lceu-2012-virt-snapshots-kashyap-chamarthy.pdf
https://kashyapc.fedorapeople.org/virt/lc-2012/snapshots-illustration.txt
https://kashyapc.fedorapeople.org/virt/lc-2012/live-backup-with-external-disk-snapshots-and-blockpull.txt
https://iclykofte.com/kvm-live-online-backups-external-and-internal/
https://wiki.libvirt.org/page/Live-merge-an-entire-disk-image-chain-including-current-active-disk

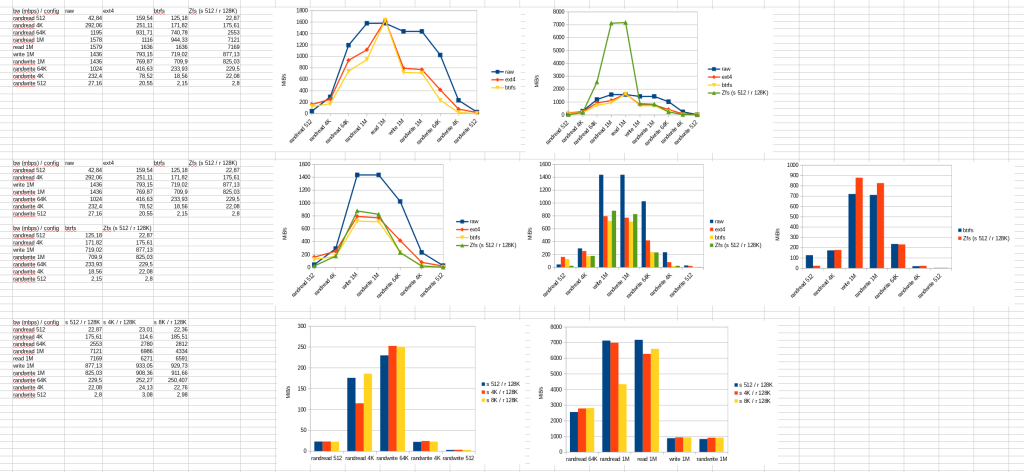
Optane 900p 480G: zfs vs btrfs vs ext4 benchmarks

I recently bought a new server with an Optane 900p 480G and I decided to give zfs a try instead of using btrfs as usual (I will not use raid or other devices, just a single 900p).

I will use my Optane drive to host several KVM virtual machines.

I have been fooled to think that the native sector size was 512B by the fact that we weren’t allowed to reformat the NVMe to 4K/8K:

https://github.com/linux-nvme/nvme-cli/issues/346

https://communities.intel.com/thread/124672

This seems to be just a marketing move to sell the more expensive datacenter disks, in fact some reviews suggest that 512B is emulated, as well as 4K for the datacenter disks:

https://superuser.com/questions/1263828/why-512-behaves-worse-than-4096-when-nvme-configured-with-512-sector-size

https://www.anandtech.com/show/11209/intel-optane-ssd-dc-p4800x-review-a-deep-dive-into-3d-xpoint-enterprise-performance

Regular NVMe SSDs will present a 512B emulated sector by slicing up the larger (4K/8K/etc) flash pages into the smaller sector. Optane on the other hand is byte (bit?) addressable by design so all of its “sector sizes” are emulated by assembling a sector from each individual component. Since we are able to choose freely both the sector size and the record size the question is: which one to choose?

Since I plan to use compression I need to basically rule out all combinations where sector size equals record size. Recordsize is on the uncompressed size, so if you take an 8k record, compress it to 5.3k, you then still have to store that data in a 8k sector, so you save nothing. So I will consider only record sizes which are at least 4 times the sector size.

I also decided to throw raw device, btrfs and ext4 values to the mix, just to make things more fun.

I used fio 3.6 benchmark for the worst case: queue depth 1, single job. I also used direct=1 for the raw values, but I didn’t find a way to completely bypass caches for zfs.
Disk partitions has been aligned at 1MiB by zfs itself.
For a 512 sector size you need to set ashift=9 for your whole zpool, ahift=12 for 4K and ashift=13 for 8K.
On the contrary you can set recordsize=512, recordsize=4K or recordsize=8K on per-dataset basis.

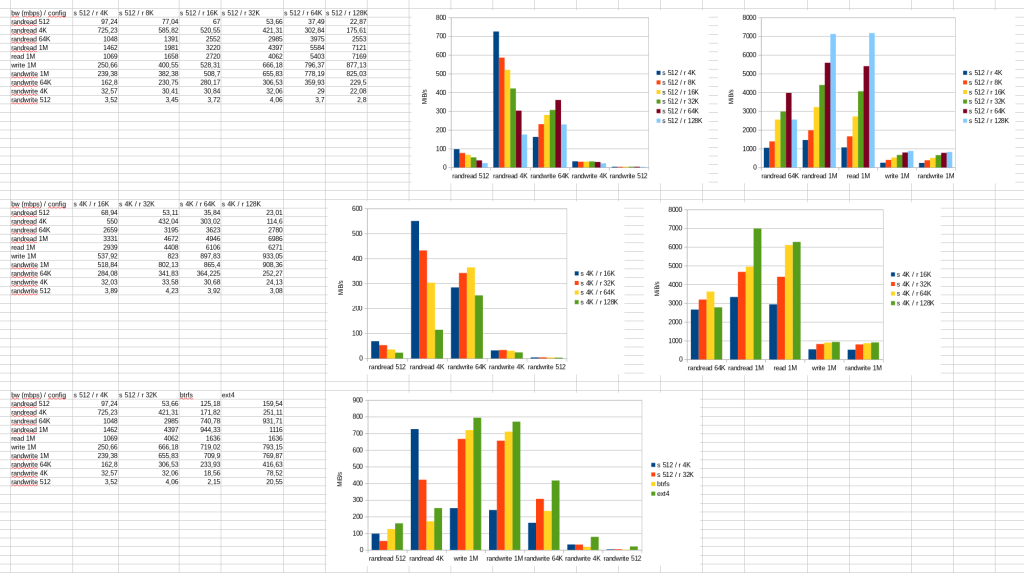
Here are the results:

optane_bench_1


optane_bench_2


I suggest you do download the calc file:
optane_benchmarks

And the fio output, along with the commands I used:
optane_benchmarks_results

The official zfs wiki suggests a 4K recordsize to store virtual machine images, so I will probably opt for a 512 sector size with a 4K recordsize for VMs and a 32K recordsize for everything else.

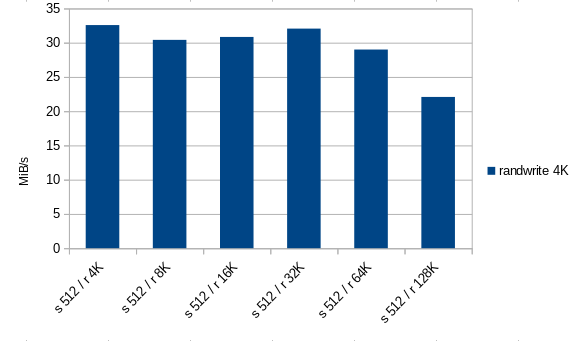
EDIT: the ‘none’ scheduler has been used. It wasn’t clear from the previous graphs, but going from the default s 512 / r 128k (22,08 MiB/s) to s 512 / r 4k (32.57 MiB/s) leads to a 48% improvement in 4k randwrite, while s 512 / r 32k still retains a very good 45% increase in performance.
optane_bench_3

IKEA: Swedish inefficiency at its best

IKEA's customer service.

IKEA’s customer service.

This is somehow a technical blog so I’m sorry to bother you with personal complaints like this one, but as an Engineer I cannot avoid to be stunned watching such impractical implementations.
Some of the IKEA furnishings are sold as two (or more) separate pieces, which is fine. The funny part is how they handle such a thing. I came to IKEA to help my mother loading a furnishing into her car, so we asked the department manager which furnishing may suit our needs and she gave us a piece of paper with the product code of the pack to pick up from the warehouse. Then came my first error: I didn’t pay enough attention when picking the pack from the shelf. There was a single product code and the boxes were all similar (identical except for a small label with a number) and so I didn’t think about the possibility of having to pick up two different pieces from the very same shelf with the very same product code. The fault was mine, so shame on me. But let’s move on. We headed towards the self-service checkout and while I was going crazy trying to find my IKEA Family card (I don’t know if they already made one but in the 2016 an app would definitely help, I’m tired having to carry dozens of fidelity cards) in the meantime my mother found hers and started checking out at the self. The system printed a warning informing that the barcode was associated with a two pieces article and in the best “point-and-click” Windows tradition my mother clicked “OK” without even noticing the message. Moral of the story we carried a single piece but we paid for the whole furnishing. We didn’t notice the missing parts until Monday, when I began to assemble it. What left me astonished is how they handle multipart articles: they load almost identical parts in the very same shelf -without tying them together- under the very same product code, but only the first one has a barcode. So if you pick only the first one and accidentally miss the warning at the self-service checkout you’re doomed. This is a big problem when paired with their inventory mess and I really don’t understand why they don’t simply print a different barcode on each piece and prevent the self-service to checkout until you scanned all of them. Simple and easy, but if their outdated systems cannot manage to achieve this they can simply tie the two pieces together, which they didn’t. When you couple this with one of the worst customer services I have ever seen the omelet is served. They didn’t seem surprised of what happened, in fact at first they told me “don’t worry, it happens very often”, but they have such a mess in their inventory that they didn’t succeed finding the missing piece so they told me that I will have to pay for the whole furnishing again if I wanted the missing piece. I asked to talk with the customer service supervisor to ask if they were really afraid of me trying to steal half of the most economical furnishing in IKEA and it happened that they cannot afford to run such a risk: when in doubt they prefer leaving unhappy customers having to buy the very same article twice. Talking with their customer service was a painful experience, but at least it teached me something: do to not rely on such big companies when you need to buy something for which you may need assistance in the future. Just save a little more money and avoid you future headaches buying from someone who knows the meaning of “customer satisfaction”.

Alcuni dei mobili IKEA vengono venduti come due (o più) pezzi. La parte divertente è come gestiscono internamente questa situazione. Sono stato all’IKEA per aiutare mia madre a caricare un mobile nella sua macchina, così abbiamo chiesto al responsabile del reparto quale potesse fare al caso nostro e ci ha dato un pezzo di carta con sopra scritto il product code del pezzo da prendere nel magazzino. Ed è qui che ho commesso il mio primo errore: non ho prestato sufficiente attenzione quando ho preso il pacco dallo scaffale. C’era un singolo product code e le scatole erano tutte simili (identiche, ad eccezione di una piccola etichetta con un numero) e quindi non ho pensato alla possibilità di dover prendere due differenti pezzi dallo stesso scaffale con lo stesso identico product code. Ad ogni modo la colpa è stata mia, avrei dovuto prestare più attenzione. Ma andiamo avanti. Ci siamo diretti verso le casse self service and mentre stavo cercando la mia tessera IKEA Family (non so se l’abbiano già fatta ma nel 2016 un’app sarebbe decisamente d’aiuto, sono stufo di dovermi portare dietro dozzine di tessere fedeltà) nel frattempo mia madre ha trovato la sua e ha cominciato a passare i prodotti alla cassa. Il sistema ha mostrato un avviso informandoci che il barcode era associato ad un articolo formato da due pezzi, ma nella miglior tradizione “punta e clicca” in stile Windows mia madre ha clickato “OK” senza neanche accorgersi dell’avviso. Morale della storia ci siamo portati a casa soltanto uno dei due pezzi, pur avendo pagato per l’intero mobile. Non abbiamo notato le parti mancanti fino a lunedì, quando ho cominciato ad assemblarlo. Quello che mi ha lasciato veramente di stucco è come gestiscono gli articoli formati da più pezzi: caricano delle scatole praticamente identiche nello stesso scaffale -senza neanche legare assieme- con lo stesso identico product code, mentre soltanto la prima parte ha un barcode. Quindi se qualcuno prendesse soltanto il primo pezzo e accidentalmente non notasse l’avviso alla cassa self service è in un mare di guai. Questo è un grosso problema accoppiato con il loro disastro inventariale e non capisco veramente perché non si limitano a stampare un differente barcode su ogni pezzo, impedendo alle casse self service di ultimare l’acquisto finché non siano stati scansionati tutti. Semplice ed efficiente, ma se dovesse essere troppo complicato per i lori sistemi antiquati potrebbero semplicemente legare i due pezzi insieme, cosa che non hanno fatto. Aggiungeteci uno dei peggiori servizi clienti che abbia mai visto e la frittata è servita. Non sembravano essere sorpresi da quanto accaduto, infatti inizialmente mi hanno detto “non si preoccupi, capita molto spesso”, ma hanno un tale macello in inventario che non sono riusciti a ritrovare il pezzo mancante e mi hanno detto che avrei dovuto pagare l’intero mobile nuovamente se avessi voluto prendere il pezzo mancante. Ho chiesto di parlare con il supervisore del servizio clienti per chiedere se avessero veramente paura che volessi rubargli metà del mobile IKEA più economico e a quanto pare non possono correre questo rischio: per loro è più importante lasciare che un loro cliente resti insoddisfatto e che debba comprare due volte lo stesso prodotto per cui ha regolarmente pagato. Parlare con il loro servizio clienti è stata un’esperienza da incubo, ma se non altro mi ha insegnato una cosa: non affidatevi a queste grosse compagnie quando dovete comprare qualcosa per cui potreste dover chiedere assistenza in futuro. Mettete da parte qualche soldo in più ed evitatevi un mal di testa assicurato comprando da qualcuno che conosca il significato delle parole “soddisfazione del cliente”.

Radeonsi with si scheduler humiliates Catalyst in all tests

Following my last article I decided to test Axel Davy’s si scheduler and run the very same OpenGL4+ tests with both radeonsi+si scheduler and Catalyst.
The si scheduler is such a huge performance boost! Not only it is faster, but now radeonsi is faster than Catalyst in *all* tests, sometimes by a wide margin!
Catalyst version is the latest and greatest 15.7, while the radeonsi stack is from git (including linux 4.2, xorg-server git and llvm 3.8 git). I also use modesetting instead of xf86-video-ati. Distro is gentoo.

Unfortunately both Bioshock Infinite and Dirt Showdown didn’t work for me with Catalyst, quite ironic considering they both work flawlessly with radeonsi (plus a small patch)!

But now let’s have a look at some simpler foss games. Don’t consider the other cards results because they were made at 4K while my monitor is a simple full hd (1920×1080). Just compare HD 7950 radeonsi vs HD 7950 si scheduler vs HD 7950 catalyst. I asked Michael if it was possible to filter out some results, but he still has to answer me. Eventually I will update the graphs later.

Catalyst got completely humiliated! Radeonsi is so much faster that I will no longer consider Catalyst as a reference for future performance improvements: we aim at the Nvidia performance now!

I would like someone else with the very same card to reproduce my results. If you want to test si scheduler just apply this patch on top of llvm git master and comment out:

//else //(uncomment to turn default for SI)
// return createSIMachineScheduler(C);

To run Bioshock Infinite with mesa you need to apply this patch and to set this evironmental variable:
MESA_EXTENSION_OVERRIDE=GL_ARB_copy_image

EDIT: as I stated on irc the boost was largely due to a big regression reverted in mesa while doing the first test. Only a little boost is accountable for the SI scheduler.

Radeonsi vs AMD Catalyst vs NVIDIA proprietary on GL4+ workloads

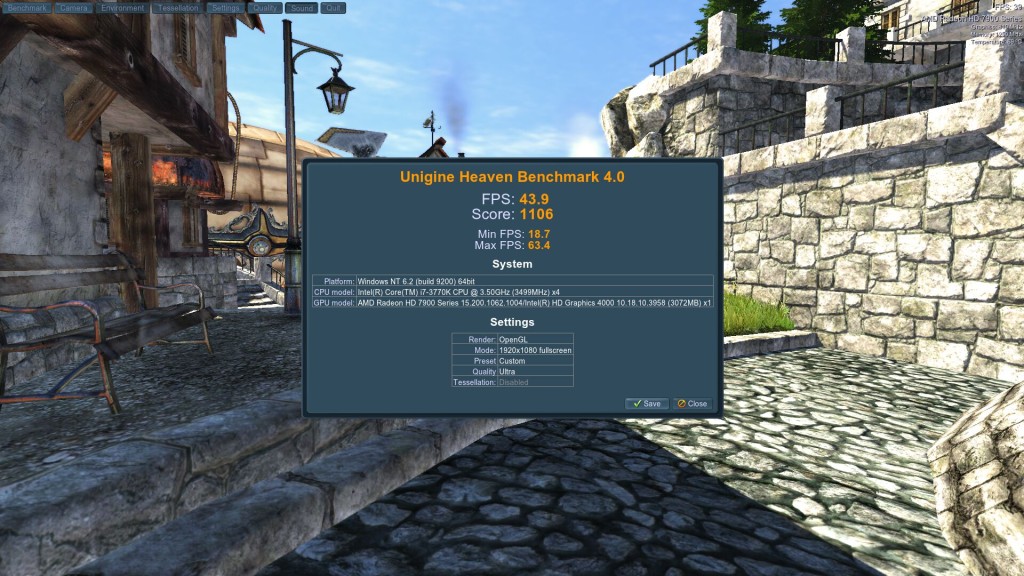
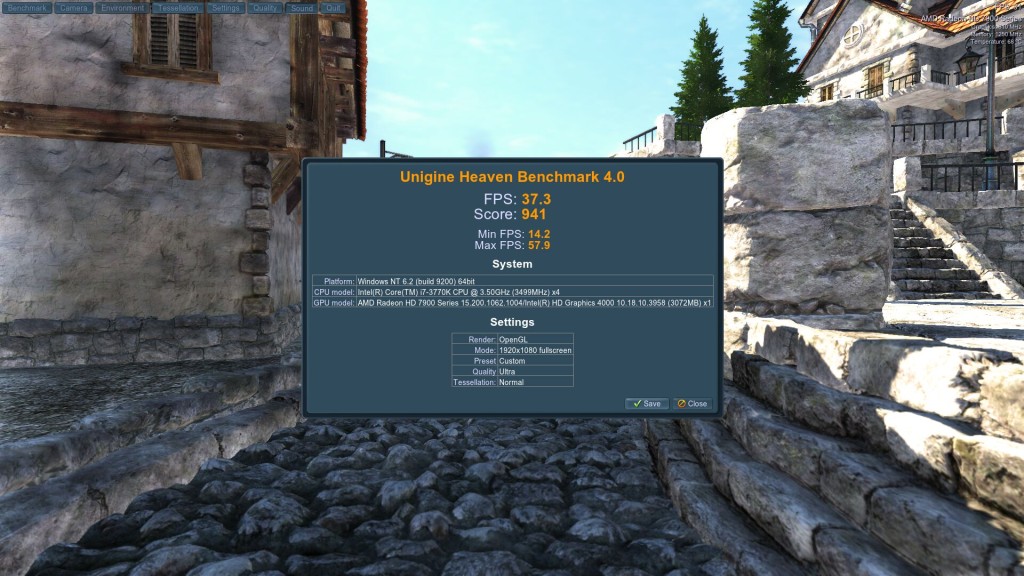
heaven_windows_tassellation_disabled

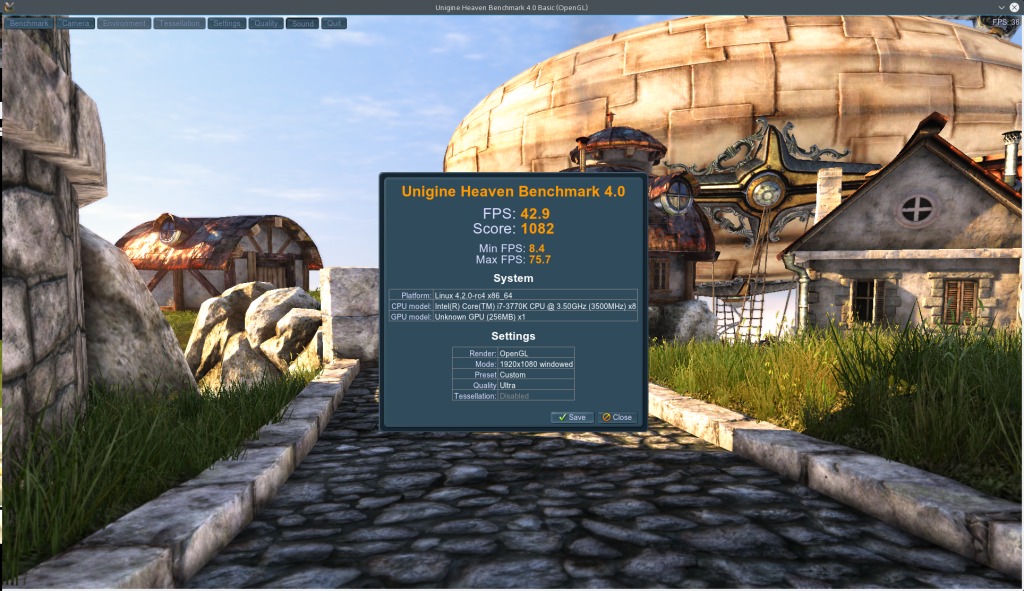
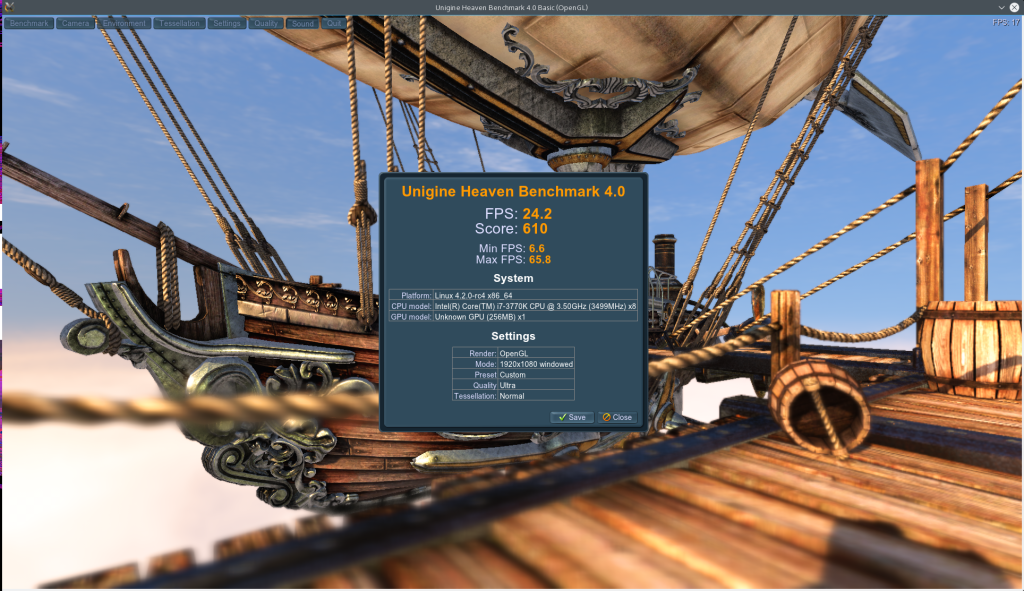
heaven_radeonsi_tassellation_disabled

heaven_windows_tassellation_normal

heaven_radeonsi_tassellation_normal

Counter Strike Global Offensive: radeonsi is on par with Catalyst

AMD Radeon HD 7950 using kernel 3.17-rc5-drm-next-3.18-wip + hyperz (R600_DEBUG=hyperz). I’m also using libdrm git, xf86-video-ati git, llvm 3.6 git, mesa git and xorg-server 1.17.0 RC 1. Catalyst version is 14.6 beta2 (kernel 3.14.3, xorg-server 1.15.2).

You can find all the info on my system here: http://openbenchmarking.org/result/1409232-DARK-140923107

wine: vanilla vs CSMT (d3dstream) vs Gallium nine vs Catalyst

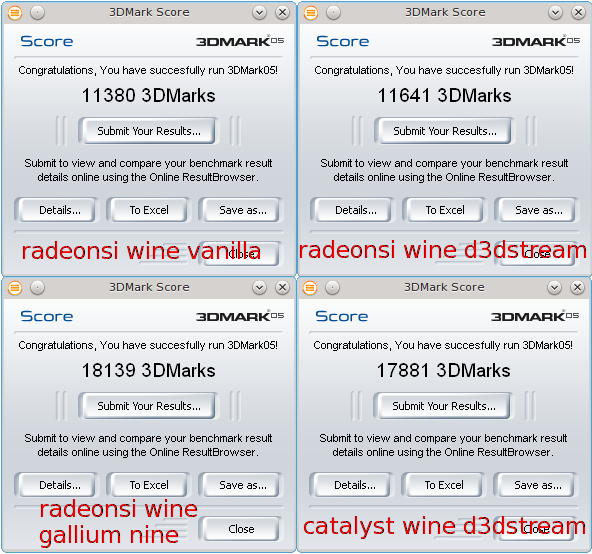
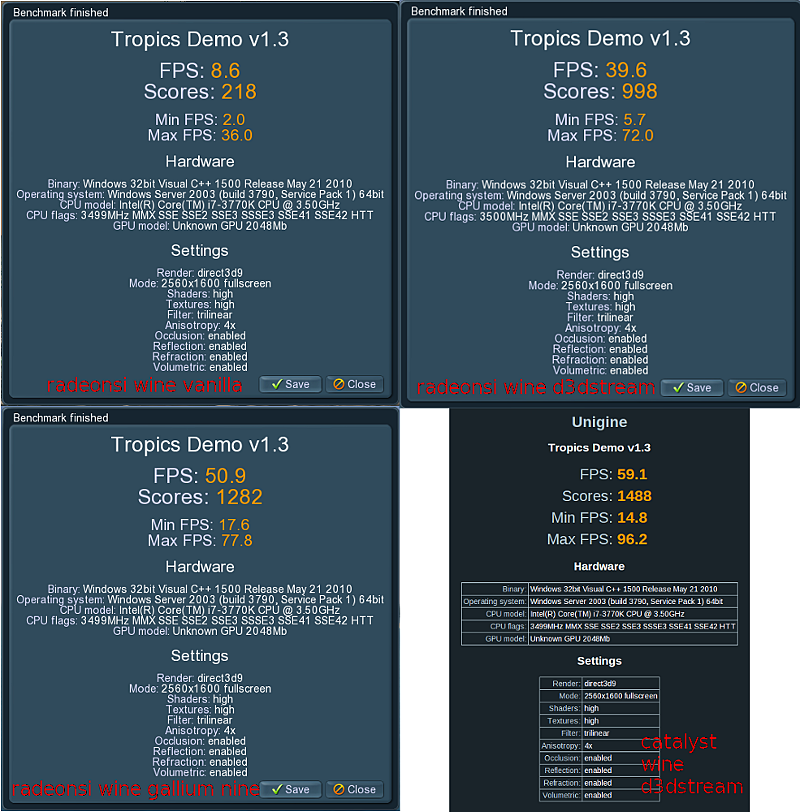
How to achieve the best possible performance with wine? I compared vanilla wine using latest radeonsi open source drivers, wine with the CSMT (d3dstream) patchset and wine with the Gallium nine patchset. I also compared the results to latest Catalyst drivers using wine patched with CSMT (d3dstream). Surprisingly radeonsi + gallium nine beats Catalyst + CSMT (d3dstream) in 3DMark2005 and reaches 86% of Catalyst + CSMT (d3dstream) in Tropics!

Soon open source radeonsi drivers with the gallium nine state tracker will be the best available solution to get the most out of wine: users aiming for the best performance should get rid of proprietary blobs if favor of open source drivers.

My card is an AMD HD7950 and I used latest graphic stack from git, including drm-next-3.18. To use gallium nine you will need FOSS drivers with a patched mesa and a patched wine. You can’t use gallium nine with proprietary drivers.

Wine has to translate DirectX => OpenGL => Gallium, which add complications and brings inefficiency. Thanks to the gallium nine state tracker we simply skip the OpenGL translation. More info here: http://ixit.cz/faster-wine-games-with-open-source-drivers-d3d9-aka-gallium-nine/

Both 3DMark2005 and Unigine Tropics runs @2560×1600, here are some screenshots:

3dmark2005_2560x1600

tropics_2560x1600

You can find my wine vanilla, wine CSMT (d3dstream) and wine gallium nine ebuilds in my overlay.

A new linuxsystems overlay: wine-nine

This overlay allows you to build latest git version of mesa and wine with the gallium nine patches. Wine has to translate DirectX => OpenGL => Gallium, which add complications and brings inefficiency. Thanks to the gallium nine state tracker we simply skip the OpenGL translation. More info here: http://ixit.cz/faster-wine-games-with-open-source-drivers-d3d9-aka-gallium-nine/

This patchset is maintained by David Heidelberger (here you can find his work).

You can find my media-libs/mesa-9999 and app-emulation/wine ebuilds with gallium nine patches in the new wine-nine overlay: http://www.linuxsystems.it/overlay/

New ebuild: app-emulation/wine-1.7.24 CSMT (d3dstream)

You can find it in the wine-d3dstream overlay: http://www.linuxsystems.it/overlay/

A new linuxsystems overlay: wine

Latest wine version is currently 1.7.26 while latest version available in gentoo repositories is only 1.7.21.
This overlay allows you to build latest version of wine with pulseaudio, pipelight (compholio) and gstreamer support.

You can find my app-emulation/wine-1.7.26 ebuild in the new wine overlay: http://www.linuxsystems.it/overlay/